
CHINESE FEDERATION
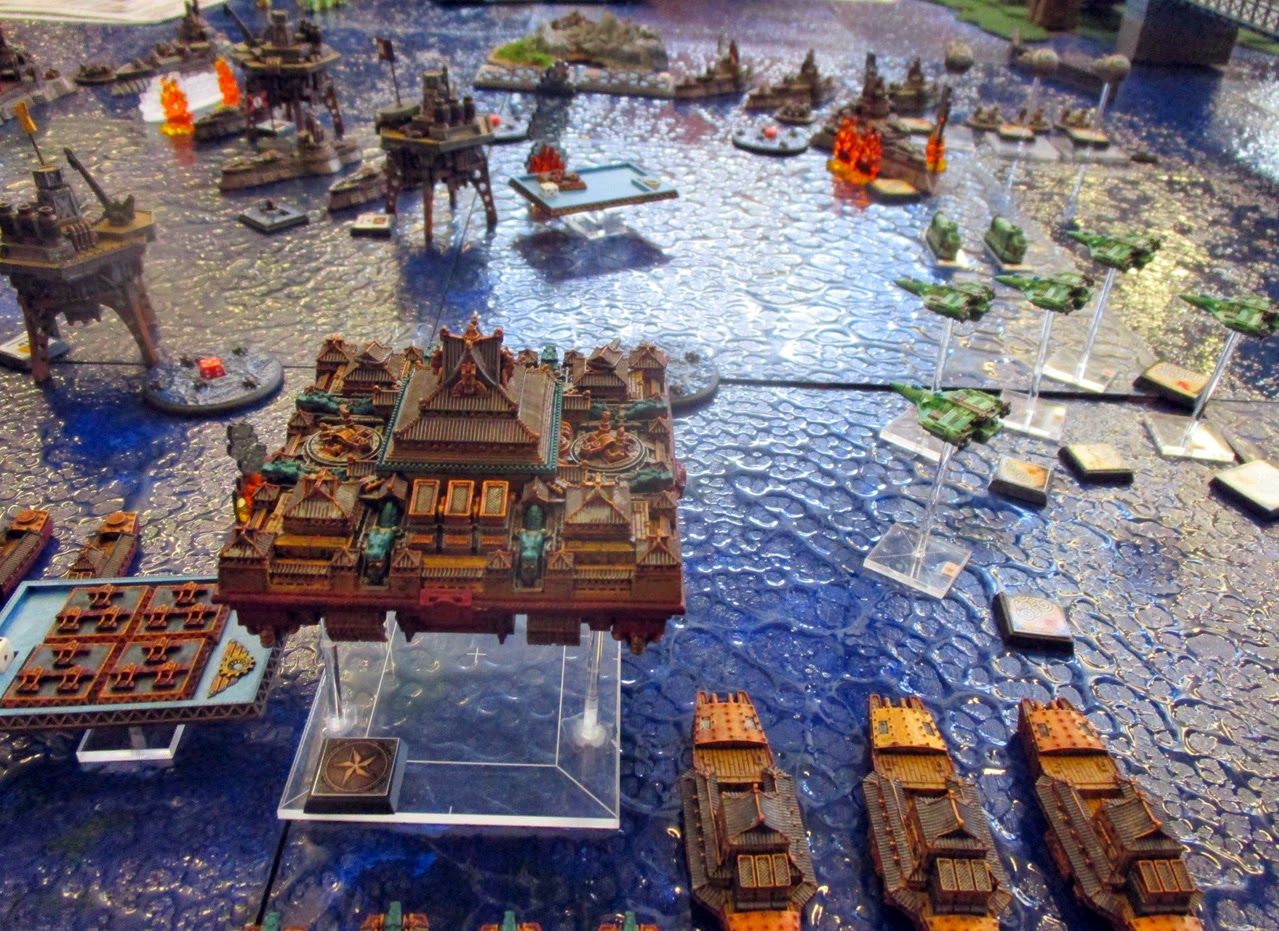
My plan was essentially to drive forward using my bastions, Yurei terror ship and frigates to suck the hits from those big Russian guns to protect my large and medium units while advancing towards the oil rigs . My plan was to rely on the big Chinese Federation guns to knock AP and HP off the Russians and use my conscript hordes to overwhelm them in turns two and three, and seize the oil rigs.
 I tried to keep the Guan Dao, Tetusbo Interceptors and the Japanese War Gyro on the right side of my deployment zone near the bridge to provide a field of fire, while sending the bulk of my force up between the rigs. The brave corvettes were aimed directly at the Russian dreadnought to strip off AP before boarding it with other units.
It was a hard fought game and I never felt comfortable until the final count up. Those Russians put out an enormous amount of firepower but thankfully those hardy Chinese were able to shrug off a lot it. The plan broadly worked well to keep my two units of Dao Crusiers and their precious AP protected until the end game, though the loss of both my Jian Battleship and Dreadnought at the end of turn three was painful. I feel I also finally got my head around integrating the TAC cards with my tactical play.
I did pretty well dominating the objectives in turns three and four, and I had the advantage of being able to out activate the Russians with my squads of smalls and SAWs. The plan of attacking the Russian dreadnought with my Corvettes worked better than expected, and I was able to take it derelict it in turn two.
The Yurei Terror ship was a bit of a let-down, especially when its generator was cloned by the Russian Skyship in turn one, though it did suck up a lot of enemy fire,
I probably would have been a little less cocky with Terror Ship in turn one and would have hid it among the rigs. I also would have placed my War Gyro closer to the action as its slow move meant it played less of a part in the game than I would have hoped.
I also might have tried to support my Battleship a little bit more and the proud ship suffered mightily at the hands of those Russian guns.
The MVP is a hard choice. I was really pleased to be able to get good value out of both my Guan Dao Battlecrusier and Chui Carriers, which are both units that I haven't had much luck with in the past. The Dreadnought was also magnificent, sucking up barrage after barrage from the Russians, and the Corvettes did a fantastic job of the neutralising the threat of the Russian Dreadnought.
However my MVP award has to go my two units if Dao Cruisers, who managed to prize both the Russian Skyship and the Khatanga Heavy Battleship, as well as landing AP on the oil rigs at key moments. I doubt I could have won without that late game push.
EMPIRE OF THE BLAZING SUN
I split my force into two parts. I had an assault group, which included the Taka Ashi Mk I Heavy Walker, Ronin Mk II’s, Bansan small walkers, Ke-Ho Small tanks and the Ryuo Hover Squid. This force boasted a large number of Elite AP who benefit from both Guardian Generators and the ‘Die Hard Attitude’ Combat Coordinator. Their job was to cross the open ground between the cities, and seize the enemy objectives, while taking out any large Russian tanks they met along the way. I knew the Russian range would be a factor, so I also intended for this group to take most of the early hits, in the hopes that the Guardian Generators and Rugged Construction on the squid would mean they would remain an effective boarding threat even after taking damage.
The other part of my force was designed to stay out of Russian effective range for as long
 as possible to preserve the potency of their weapons, and pour fire into advancing Russian armour. This included the big guns of the Taka-Ashi Mk II, rockets of the Miage-Nyudo Heavy Walker, the Inari gyros and the Kagoshima mobile airfield, supported by a collection of Bansan walkers, Myobu hover tanks and Chi-Ri medium tanks.


Battle Report: [Part One] [Part Two] [Part Three] [Part Four]
I was also very worried about trying to secure air supremacy. The PLC air contingent included interceptors, and 5 medium airships who had both good gunnery and boarding threats. I knew that I had more SAW than my opponent, due to the mobile airfield, so I planned to task as many fighter wings as possible, removing aerial threats, then re-purposing the SAW as dive bombers.
Things, more or less, went as planned. I hadn’t expected the concentrated, aggressive PLC air attack so early in the game, but this actually worked well for me, as I was able to concentrate my fire on this threat, then move on to other targets once the airships were destroyed. The PLC Flame Retardant Armour proved to be a pretty big headache, as it turned a MAR which is usually a benefit for Blazing Sun models, into a drawback.
My opponent had some really poor luck, both in failing to secure the Imperial Alchemical Institute with his Sky Fortress on Turn 2 and with the Vortuka Land Driller failing to beat the DR of the Taka Ashi Walker, which led to the Vortuka subsequently being boarded and left derelict. However, the Ronin walkers capturing the Kursk land dreadnought was a pretty big moment for me, and downing his PLC airships before they could launch a boarding attack and then prizing his sky fortress also really proved a significant blow to Russian morale. The Ryuo Hover Squid did not play as much of a role as I’d have liked, as it could have really torn up the Russian medium tanks on the flank had it managed to reach them, but it did soak a lot of enemy firepower, and thus served a valuable purpose.
I was a little surprised at how well the PLC and Russian SAW did in dogfights with my own fighters, but my SAW did manage to remove the threat of the PLC airships early on helped by my activation advantage over the Russians (due to having more carriers and many of Russian and PLC small tank squadrons being embarked in larger models in the early turns).
Because I spent so much time focussing on the large Russian tanks, when they were destroyed, my own small and medium tanks were not well placed to fight the small Russian tanks that had used the land dreadnought and land-ship as cover. This meant that in turns 3 and 4 the Russian small and medium tanks were able to put a lot of fire into my large (massive) walkers which loomed over the terrain without any significant return fire from me, and ultimately led to their destruction. That’s something I should have foreseen and prepared for.
I also should have thought more about how to aggressively capture the enemy objectives during force construction. While the walkers were good, they were really too slow for this role as I wanted to maintain a radius for the guardian generator and die hard attitude combat controller, which benefitted as many models as possible. Flying models would have been faster and much more versatile, so I should probably have dropped the Inari or Raijin and picked up a squadron of DFA-170’s or Onryo Gyros operating at the stratospheric height level to advance rapidly, draw enemy fire, and aim to capture the enemy objective in turn 3 (or even turn 2 if I deployed them as advance strategic forces).
Everything in my force pretty much lived up to expectations. The Tenkei Sky Fortress deserves a mention, as it led the assault on the PLC airships and managed to replenish my SAW sustaining their attack, before it ultimately crashed and burned. Probably the single most valuable squadron in my force were the Ronin Mk II’s which did a great job of shielding other models with their guardian generators, and then decisively boarded the terrifyingly large Kursk land dreadnought - although it does feel strange to award the MVP to a model without a gun!
RUSSIAN COALITION (Armoured Command)
My initial plan was to push the Polish-Lithuanian Air Force forward on the flank to seize the nearer objective while driving the main force forward in the centre, with big models forward, medium and smalls using them as cover for later turns. By advancing on two fronts I was trying to create a dilemma and force a split in the enemy forces. At the same time a blocking force was placed on the bridge to hold back anything moving along that route and the Vorkuta Drill would push forward underground to deal with the enemy bunker complex from the side or rear outside of weapons range. By pushing the Air units over water I hoped to provide some measure of security from RB2 fire once they closed up.
The first few turns went reasonably well though I found the Air units with their better speed and lack of cover due to height caused them to get de-synchronised with the main force and subsequently they were exposed early and suffered a lot of fire. This enabled the opposing commander to better apply all his weapon systems and meant I lost my medium Air units quite quickly though not without dealing a significant blow to the opposing sky fortress. I also realised that with the enemy bunker placement and the pace of the game the Vorkuta Drill was not going to make it to the bunker complex so I decided to use it to take out a closer larger walker.
Turn three was a bit of a disaster. My dreadnaught had ventured too close to some medium Ronin Walkers loaded with AP which meant it was lost to boarding and resulted in a new found respect for the boarding capacity of a squadron of Ronin Walkers. I would have liked to have boarded the enemy objective with the Gryf Flame Blimps but these had been lost in the last turn so I left the job to seize the objective to the sky fortress. Unfortunately the boarding did not go well here and I was left without the objective and the now empty sky fortress ended up being prized, an expensive mistake. Finally the Vorkuta Drill had no effect trying to ram the large walker due to an exceptionally bad roll and the walker was then able to board it back with ease. Both the sky fortress and drill actions were high risk high payoff which unfortunately did not go quite to plan and left me in a poor position at the end of turn three.
Turn four was better with the well protected mediums and smalls now free to be able to engage at RB 1 and 2 and deal out significant damage which dispatched most of the large and medium models in the immediate vicinity. I was really impressed with the Russian small tanks, including those that had been with the Vorkuta, which managed to deal a great deal of damage in the latter part of the game. Unfortunately I was unable to make up the lost points from the heavy losses and prized models from the previous turn.
In hindsight I could have placed all the fortification further forward. The towers and bunker would have provide much needed fire at longer range further forward and the airfield located close to the front of the city could have resupplied flyers a bit early on. The airfield also has a surprisingly effective weapon. The towers did however provide a measure of deterrent against using the bridge but trying to spread their benefit across the naval and land domains meant they ended up a bit of a wasted asset.
The Zamiac Sky Fortress was my nomination for most valuable unit. The 2.0 rules make the carriers a lot more usable and effective and there is something quite pleasurable about opening up in RB1 with heavy flame throwers. It managed to get deep within enemy territory and, had I rolled better on the boarding, it could have quite possibly captured the enemy objective. Overall I was quite impressed with the Polish Lithuanian Air Cadre as a battle-group and the flame retardant armour is an excellent defence against incendiary ammunition.
RUSSIAN COALITION (Naval Command)
My plan was to deal with the Terror ship and try and mimic the phase generator, while moving forward my medium flyers to board objectives and then carry on and drop mines to make life tough for the Chinese smalls. My subs were tasked with a flanking movement to cause the Chinese to divert resources to cover the threat. Otherwise general advance was called for.

First turn started very well, and as the Terror ship took a few hits, I did get to mimic the phase generator with my heavy flyer... My medium flyers did board an objective and capture it, unfortunately one by one all 3 fell to withering Chinese firepower and did not survive to move again and drop mines. My subs did move up the flank and on turn 2 rather than trying to circle the small island and get to the rear (this would have taken too long) they surfaced and tried a snap shot at the Chinese battleship... and missed, and along with that, could not dive back to safety - they were obliterated by bombers other ordnance, not much of diversion.
 As my dreadnought got boarded and
captured by crazy Chinese corvettes, I should have protected it more
from the charge of these little killers...
As my dreadnought got boarded and
captured by crazy Chinese corvettes, I should have protected it more
from the charge of these little killers...
Its hard to pick my favourite squadrons, but my corvettes finally dealt with the Terror ship (that was taking a lot of fire without further HP damage), my heavy flyer for use of the mimic generator and my heavy battleship, who was throwing out crits quite regularly with the heavy mortars...
My plan was to deal with the Terror ship and try and mimic the phase generator, while moving forward my medium flyers to board objectives and then carry on and drop mines to make life tough for the Chinese smalls. My subs were tasked with a flanking movement to cause the Chinese to divert resources to cover the threat. Otherwise general advance was called for.
First turn started very well, and as the Terror ship took a few hits, I did get to mimic the phase generator with my heavy flyer... My medium flyers did board an objective and capture it, unfortunately one by one all 3 fell to withering Chinese firepower and did not survive to move again and drop mines. My subs did move up the flank and on turn 2 rather than trying to circle the small island and get to the rear (this would have taken too long) they surfaced and tried a snap shot at the Chinese battleship... and missed, and along with that, could not dive back to safety - they were obliterated by bombers other ordnance, not much of diversion.
Its hard to pick my favourite squadrons, but my corvettes finally dealt with the Terror ship (that was taking a lot of fire without further HP damage), my heavy flyer for use of the mimic generator and my heavy battleship, who was throwing out crits quite regularly with the heavy mortars...
Scenario Review
I had envisaged that over two days we would be able to complete a roughly 6 turns, as we were using the multi-player rules which allow simultaneous activations on each side. 6 turns would be sufficient for even the slowest land model to have a chance to contest each objective. As it turned out we only completed 4 turns, although the lethality of the game meant that our last turn only took a fifth of the time as our first turn, so had we played on for a few more hours we would probably have finished 6 turns, but there may not have been many models left to cross the board!
In retrospect, I think the set-up would have worked better if both sides had a ‘safe’ objective on land and at sea, and there was also a ‘contested’ objective in each theatre. This would have made for an interesting trade-off in terms of protecting your own objective vs aggressively attacking the objective vs intercepting the enemy. Next time perhaps... J
We also did not have sufficient time to deploy the Reserve Forces – however, we have decided that armoured columns of the Dominion of Canada and Scandinavian Teutonic order met en-route to the city and fought a battle there – which we’ll play out as a separate game in October!
Battle Report: [Part One] [Part Two] [Part Three] [Part Four]